NixOS: The Ultimate Dev Environment?
Contents
This post is another in an unstructured series of nix and NixOS related
material. It hopefully provides a few new takes on what was already covered by
For developers and Containers a la Nix. It is a case-study of a recent “full
stack”1 polyglot pet project of mine combining tools and languages that I
enjoy: nix, Haskell and TypeScript. It’s a good candidate to serve as an
example application of nix flakes and how they can be used to combine
different language environments in a monorepo, while at the same time having a
codebase small and unimpressive enough to not get in the way.
What got me motivated into writing this post is that once all the pieces came
into place the resulting development workflow turned out to be quite amazing. Of
course it might not be perfect or even suited to everyone else out there, but at
the very least I hope it serves as inspiration to finding your own perfect
setup. Also I should note that flakes are quite new to me and so I wouldn’t
claim to be following best practice. I’d love to hear about improvements,
misconceptions and remarks regarding the presented content.
The application is an ad-hoc copy/paste app allowing to share a piece of text or
a secret between two computers using a Web Browser. To avoid having the shared
data pass through the backend server it’s using WebRTC to establish a
peer-to-peer data channel connection. In order for WebRTC to work a signaling
server is required to help the peers connect to each other. This signaling
server is implemented in Haskell.
The application is live at cp.myme.no/ and the code is hosted on github.com/myme/xchg (commit from the time of writing this article).
The elevator pitch
For developers did an attempt at selling the purpose of pursuing nix for
software projects, but it doesn’t hurt to reiterate:
Arguably the sole purpose of using computers and building software for them is to automate tasks for humans. Computers tirelessly execute automated work to simplify and augment2 anything from the lives of individuals to world-spanning business endeavors.
Computers don’t discriminate the task that they are given, yet it’s common for us humans to discriminate the tasks we want the computers to solve. It’s not uncommon to see effort directed primarily towards meeting metrics and measurables that directly affect the revenue bottom line, customer satisfaction or whatever good user-facing feature seemed important at the time. While it’s hard to disagree with such a sentiment (not making money is a sure way to kill any project), what’s hard to measure on the bottom line also becomes what’s hard to justify investing time in.
Software does not write itself, and computers do not write (amazing) software3. Humans write software – and I’m sorry to say we’re often not all that great at it. We need computers to help us maintain quality in the work that we do. Computers help us scale – because humans scale poorly. The output we produce is limited to the time we get to spend uninterrupted at our keyboards, while our minds cannot easily be shared with our peers who require assistance.
I believe the efforts we make to automate the setup and execution of
deterministic development and build environments significantly improve the
overall quality and velocity of software projects. A reproducible environment
scales to any number of developer machines, continuous integration servers or
production nodes. Although there are many great tools that do this in various
ways no tool that I know has done it to the extent and with the level of success
that nix has.
Hey, wait, you said this was an elevator pitch. Enough talking!
Right. Let’s measure success in lines of bash. Starting with launching a
development server from scratch by running a single command:
❯ nix runPreparing a deterministic editing environment for
<insert-favorite-editor-here> with access to compilers, LSP servers, static
analysis tools and whatever else you desire:
❯ nix developBuilding a complete application container image without worrying about sudo
docker commands, pinning apt sources in a Dockerfile or having an
otherwise inconsistent environment during the image creation:
❯ nix buildComing from a npm, cargo or poetry-based project this might not be all
that impressive to you. But contrary to language-specific package managers the
nix commands above all ensure that every single required dependency is
fetched, built4 and available before launching the respective executables
and shells. Equally important, build recipes are composed and reused ensuring
there’s no difference between the way something’s built for development as for
production.
The rest of this article will assume familiarity with the nix and its
ecosystem. Following are some of my previous posts on nix which might help
build some foundation for the rest of the article:
Nix Flakes
If you’ve been worried about “pinning” nixpkgs or using tools like niv to take
back control of you nix inputs and so on then flakes might be for you. The
seminal article that most seem to point to as an introduction to flakes is
Eelco Dolstra’s Nix Flakes, Part 1: An introduction and tutorial. In my opinion
it does give a digestible introduction to why flakes were needed and how to
get started, so it’s definitely worth the read.
Do not expect this article to give a thorough introduction to the what’s and
why’s of flakes. I’ve only recently started to use them more extensively
myself and there are most likely more in-depth and precise writeups out there.
Another caveat is the fact that the commands and APIs are still marked
experimental and may experience some changes in the future.
Flakes are (still) an upcoming feature of the nix package manager. It was
only in the fairly recent nix 2.4 release that it was made a generally available
feature, yet behind an experimental toggle. In order to enable both the nix
command5 and flakes support add the following to ~/.config/nix/nix.conf
(or /etc/nix/nix.conf):
experimental-features = nix-command flakes
or for NixOS under nix.extraOptions in the system’s
/etc/nixos/configuration.nix:
nix = {
  extraOptions = ''experimental-features = nix-command flakes'';

  # The following previously got a pre-release of 2.4 and may no longer be necessary.
  # If the system is stuck on an older then channel then this might still be useful.
  package = pkgs.nixFlakes;
};
If you just want to try it out it’s also possible to simply pass the following
command line arguments to the nix commands intended to be used with a flake:
❯ nix --experimental-features "nix-command flakes" <...>Dependency pinning
Traditional nix commands typically would map a reference to <nixpkgs> to a
channel or pinned version of the github.com/NixOS/nixpkgs repository. This puts
the responsibility directly on the user of nix to ensure a package stays
fully reproducible. Outside factors like a rouge NIX_PATH environment variable
can have devastating effects on the build result of a nix expression.
Flakes make a few changes to this model where first of all builds are even
more hermetic than previously. Fixed output derivation fetchers like fetchGit
and fetchTarball has allowed sources to be fetched from various locations, but
require hashes to be considered pure. Manually calculating and updating
revisions and hashes is tedious work. Impure inputs are disabled by default and
flakes ensure inputs are consistent by introducing a perhaps familiar concept:
lock files, named flake.lock. These lock files are only updated by running
package update commands like nix flake update.
Here’s an example based off the project’s flake.lock:
{
  "nodes": {
    "nixpkgs": {
      "locked": {
        "lastModified": 1628427351,
        "narHash": "sha256-WuZUIQ07AvRw+T9wvQ3qFf8MXmKZ+ktZz9drNgWXDbs=",
        "path": "/nix/store/aqinic6h77nrsrzwdsq2mxihw0kd87ml-source",
        "rev": "348bc5de8bca09c624f5c4975f538684da4713d2",
        "type": "path"
      },
      "original": {
        "id": "nixpkgs",
        "type": "indirect"
      }
    },
    "root": {
      "inputs": {
        "nixpkgs": "nixpkgs"
      }
    }
  },
  "root": "root",
  "version": 7
}
The lock file does not mention exactly where to fetch the given inputs.
Resolving the symbolic indirect inputs like "nixpkgs" is the responsibility of
the flake registries and beyond the scope of this post.
Anatomy of a flake
The flake schema over on the NixOS wiki lists all of the attributes supported by flakes in more detail. Following is a quick run through.
Top-level attributes
Here’s an extract showing the 3 top-level attributes description, inputs and
outputs:
{
  description = "xchg - Exchange stuff between things using WebRTC";

  inputs.nixpkgs.url = "nixpkgs";

  outputs = { self, nixpkgs }: {
    # ...
  };
}
The description should be self-explanatory. The inputs are either absolute
URIs to flakes or symbolic identifies, again managed by the nix registry.
The inputs are what nix will lock in the flake.lock file. Finally the
outputs describe the various flake outputs, which aren’t necessarily just
applications or libraries, but also development environments and NixOS
modules.
Output schema:
Flake outputs describe all the possible outputs, results or build targets if you
will, of a flake. One important thing to note is that each output attribute is
actually an attribute set over the systems that the flake supports, like
x86_64-linux, aarch64-linux, i686-linux, x86_64-darwin.
Here’s one version of the output part of the project’s flake.nix with some
annotations added:
{
  # overlay are exposed in dependent derivations through callPackage
  # NB: Some care needs to be taken no to introduce infinite recursions.
  overlay = (final: prev: {
    xchg = (final.callPackage ./. { } // {
        server = final.callPackage ./server { };
        frontend = final.callPackage ./frontend { };
    });
  });

  # executed by `nix run`
  apps = forAllSystems (system: { dev = nixpkgsFor.${system}.xchg.dev; });

  # executed by `nix build .#name`
  packages = forAllSystems (system:
    let pkgs = nixpkgsFor.${system};
    in {
      image = pkgs.xchg.image;
      server = pkgs.xchg.server.server;
      static = pkgs.xchg.frontend.static;
    });

  # executed by `nix buil` (no name, aka default package)
  defaultPackage = forAllSystems (system: self.packages.${system}.image);

  # executed by `nix develop` (also used by nix-direnv's "use flake")
  devShell = forAllSystems (system:
    mergeEnvs nixpkgsFor.${system}
    (with self.devShells.${system}; [ frontend server ]));

  # executed by `nix develop .#name` (development shells)
  devShells = forAllSystems (system:
    let
      pkgs = nixpkgsFor.${system};
      haskellPackages = pkgs.haskellPackages;
    in {
      frontend = pkgs.xchg.frontend.shell;
      server = pkgs.xchg.server.shell;
    });
}
Home-grown utilities
The nix expressions above do get a bit convoluted due to a couple of functions
called forAllSystems and nixpkgsFor. The reasoning behind these utilities is
to generate nixpkgs and outputs for all valid systems. Using helper functions
like these avoids some repetitive code where attribute sets for each supported
system would have to be defined for each output. Here are their definitions:
let
  supportedSystems = [ "x86_64-linux" ];
  forAllSystems = f: nixpkgs.lib.genAttrs supportedSystems (system: f system);
  nixpkgsFor = forAllSystems (system:
    import nixpkgs {
      inherit system;
      overlays = [ self.overlay ];
    });

in {
  # ...
}forAllSystemsBuilding an attribute set by mapping a function over all the supported systems. Typically this is useful to create derivations for all supported systems by reusing a single derivation definition.
nixpkgsForInstantiates the
nixpkgspackage set for all the supported systems as well as including the flake’s ownoverlaywhich contains the derivations being built.
Flake utils
There are tools for these kind of things if we don’t want to write these small
utilities ourselves. Particularly eachDefaultSystem from
github.com/numtide/flake-utils helps to reduce the complexity of a flake by
allowing to specify an outputs set which is shared for all supported systems. To
make use of it flake-utils can be added just as another input to the flake. It
would turn the expression into something like the following, producing the exact
same outputs as before while looking a bit cleaner:
{
  inputs.nixpkgs.url = "nixpkgs";
  inputs.flake-utils.url = "github:numtide/flake-utils";

  # Note how `flake-utils` becomes an input to the outputs
  outputs = { self, nixpkgs, flake-utils }:
    # This creates equal attribute sets for each supported system
    flake-utils.lib.eachDefaultSystem (system:
      let
        pkgs = import nixpkgs {
          inherit system;
          overlays = [ overlay ];
        };

        overlay = (final: prev: {
          xchg = (final.callPackage ./. { } // {
            server = final.callPackage ./server { };
            frontend = final.callPackage ./frontend { };
          });
        });

      # Instead of "rec" (which is susceptible to infinite recursion),
      # referring to sibling outputs can be done using `self.${system}.<output>`.
      in rec {
        inherit overlay;
        apps = { dev = pkgs.xchg.dev; };
        packages = {
          image = pkgs.xchg.image;
          server = pkgs.xchg.server.server;
          static = pkgs.xchg.frontend.static;
        };
        defaultPackage = packages.image;
        checks = packages;
        devShell = mergeEnvs pkgs (with devShells; [ frontend server ]);
        devShells = {
          frontend = pkgs.xchg.frontend.shell;
          server = pkgs.xchg.server.shell;
        };
      });
}
Bear in mind that in order to use eachDefaultSystem every output must have the
same build expressions across all supported systems.
I’m not sure if it’s idiomatic, but it seems to make sense to me that
flake.nix should primarily define the purpose of components without having
too much additional nix “logic”. It’s a declarative definition of the various
outputs that a package may have. Then by using regular default.nix files
written in a callPackage design pattern users are still granted control over
exactly how the derivations will be used. This makes the flake more of a
progressive enhancement over “regular” nix and does not get in the way of
backwards compatibility.
For instance, a non-flake user may use the default nixpkgs to build the server
application and its shell using the following command line invocation:
❯ nix-build --expr '(with import <nixpkgs> {}; callPackage ./server {})'Overlay
One thing that can be tricky to grok the first times around with nix are
overlays. Specifically an overlay is a function applied to two different
“views” of a base package set:
- First the
finalset often called “self” is the resulting set of applying the overlay itself 🤯. - Secondly the
previousset often called “super” is the set before applying the overlay.
In the flake presented above the overlay is a core piece defining a nested
attribute set of all app derivations:
overlay = (final: prev: {
  xchg = (final.callPackage ./. { } // {
    server = final.callPackage ./server { };
    frontend = final.callPackage ./frontend { };
  });
});
This resulting structure looks something like the following simplified attribute set:
{
  xchg = {
    # Docker image
    image = ...;

    # Development server script
    dev = ...;

    frontend = {
      # Node.js + dependencies
      nodeDependencies = ...;

      # Fully built frontend as static files
      static = ...;

      # Development shell for the frontend
      shell = ...;
    };

    server = {
      # Fully built backend server
      server = ...;

      # Development shell for the server
      shell = ...;
    };
  };
}
Due to the laziness of nix the xchg packages are able to reference each
other through the final package set. For instance since each of the
sub-derivations are invoked using final.callPackage it allows the top level
image target to reference both the frontend and server derivations and
combine them into a resulting docker image.
Some care must be taken when using the final set as it’s easy to accidentally
introduce infinite recursion through self-referencing or variants of mutual
recursion.
File structure
The composability of nix is great. It’s not uncommon to see projects with
several smaller .nix files rather than a few bigger ones. This make reuse
and overriding easier. Here’s how the various .nix files are placed in the
project and set up to match the overlay structure explained above:
❯ tree -P '*.nix' --prune
.
├── default.nix
├── flake.nix
├── frontend
│   ├── default.nix
│   └── nix
│       ├── default.nix
│       ├── node-env.nix
│       └── node-packages.nix
└── server
    └── default.nix
We’ve already seen the flake.nix file. On the top level there’s also a
default.nix which contains the top level expressions for the app’s container
image and development server. The default.nix files in frontend/ and
server/ specify the build recipes for the frontend and backend server
respectively, as well as the development shells for each of them.
The files under frontend/nix are managed by node2nix, a generator generating
nix expressions from package.json and package-lock.json files. The
resulting files should not be edited manually. The files are added to git even
though the files are derived by node2nix. Similar to package-lock.json this
helps validating updates when they are regenerated.
Tracking the node2nix files does have a humorous effect on the language
distribution of the project:

Application components
Let’s step away from nix for a short while and look closer at which
technologies are used to build and drive the application itself.
Frontend
The app is not intended to appear overly impressive. It’s a simple form-based UI that allows the user to input and existing “Share Id” or start a new “Share”:

An initiating client creates a new share which generates a Share Id which may
be used by a second client to connect to the session. When the second client
connects the signaling server lets the two clients know about each other and
relays ICE information.
Once the two peers are connected the UI switches to a very simple form with a text input that lets users share plain text or hidden text. The main purpose of this app is to simplify copy/paste of e.g. a SSH public key or a WiFi passphrase to a fresh computer.
The production app does currently not make use of a STUN or TURN server, which
means that it won’t do NAT traversal and the two peers are restricted to be on
the same network. Coturn is packaged for nix and shouldn’t be too hard to
include in the app image.
Dependencies
It’s a long time since I attempted to stay up to date with the wild pace of the
JavaScript ecosystem. I’m sure React is by no means the trendiest framework
for building Web UIs in 2022, but combined with great tools like vite and
TypeScript it still feels fresh and ergonomic to me. There is also a great deal
of comfort in the maturity of these tools. As a fan of functional programming I
have yet to make more extensive use of elm, although I have been using
PureScript a bit previously.
It’s still very convenient to use npm to manage a JavaScript app’s
dependencies, even in a “nix first” project. When adding new dependencies,
upgrading them or running npm audit to audit security issues it’s nice to be
able to this with the npm commands. Here’s the package.json describing the
development and runtime dependencies as well as the scripts to be used with
npm run:
{
  "name": "xchg",
  "version": "0.0.0",
  "scripts": {
    "build": "tsc && vite build",
    "preview": "vite preview",
    "start": "vite"
  },
  "devDependencies": {
    "@types/node": "^17.0.8",
    "@types/react": "^17.0.38",
    "@types/react-dom": "^17.0.11",
    "@types/uuid": "^8.3.4",
    "@vitejs/plugin-react": "^1.1.3",
    "typescript": "^4.4.4",
    "vite": "^2.7.2"
  },
  "dependencies": {
    "react": "^17.0.2",
    "react-dom": "^17.0.2",
    "react-router-dom": "^6.2.1",
    "uuid": "^8.3.2"
  }
}
Production build
For the production build vite build is used which handles all bundling of
dependencies and optimization. The result is a static build of the site:
❯ npm run build

> xchg@0.0.0 build /home/myme/src/xchg/frontend
> tsc && vite build

vite v2.7.7 building for production...
✓ 63 modules transformed.
dist/assets/favicon.7383218d.svg   1.82 KiB
dist/index.html                    0.54 KiB
dist/assets/index.cd59808c.css     1.99 KiB / gzip: 0.84 KiB
dist/assets/index.abe69b62.js      15.49 KiB / gzip: 5.45 KiB
dist/assets/vendor.f7ee7bb4.js     141.70 KiB / gzip: 46.21 KiB
Fast feedback
Regardless if I’m working in the frontend or backend, in a dynamic or static
typed languages one thing is certain: I feel severely limited if I don’t have
some kind of a near instant feedback loop. Typically this would come from a
type-checker or static analysis tool like a linter which integrates with the
Language Server Protocol (LSP) client of emacs, my editor. For more dynamic
languages having keybindings to launch a test suite might provide a sufficiently
short feedback loop.
In many ways I’m actually quite fond of JavaScript. It’s expressive, flexible
and actually quite functional in nature. However, similarly to Python without
type annotations I quickly get to a point where I start to lose track of data
structures and function signatures. This is why I’m quick to introduce
TypeScript into my JavaScript based projects. The main reason why I
typically lean towards languages with stronger types is more about being “lazy”
than anything else. I want the computer to take care of checking the things I
don’t want to waste mental energy worrying about myself, or write tests for to
simply validate that two pieces of code fit nicely together.
Stronger types also grant the computer more insight into the code. A type checker can provide richer feedback, autocompletions make more sense, and so on.
Fast feedback is not just something that happens within the editor. For this
project I’m using vite, which provides builtin support for both automatic
reload with page refresh and Hot Module Replacement (HRM) for both
JavaScript sources and CSS. What HRM means is that whenever a change to code
or styles are saved, the development server pushes this change to the client
without having the browser reload the page:
Backend
The backend server is written in Haskell using warp: a fast, light-weight web
server for WAI applications. It’s harder to show a screenshot of a backend, so
here’s the middleware stack of the application to show off something:
main :: IO ()
main =
  Warp.run port $
    wsMiddleware getNextId state $
      routeMiddleware $
        staticMiddleware
          staticRoot
          fallbackApp
There’s a bit more to it of course, but digging into application details isn’t
the point of this article. What is interesting though is that it’s a Haskell
application and it has some dependencies.
Dependencies
Before getting into nix my goto tool for Haskell projects was stack. It’s a
great tool, but since switching to nix simply using Cabal based projects
seem sufficient. Since the main nixpkgs tool for building Cabal projects
support hpack I kind of like using it for its brevity:
name: xchg-server
version: '0.1.0.0'
dependencies:
  - base == 4.*
  - aeson
  - http-types
  - optparse-applicative
  - random
  - text
  - wai
  - wai-extra
  - wai-middleware-static
  - wai-websockets
  - warp
  - websockets
hpack generates .cabal files from package.yaml files, and that’s about it.
It allows for a short and sweet declarative definition of a Haskell package
which may later be managed by cabal2nix, the generator for Haskell packages
in nix land.
Fast feedback
One of the main reasons for using Haskell is its excellent type system.
Although it might seem good enough to run code changes incrementally through
manual compiler invocations other languages (like TypeScript) has shown us
that we’re losing out on a bunch of potential. The state of the haskell language server is getting quite good from personal experience in the small projects I’ve
used it for. Having type checks and code suggestions presented directly in the
editor as you’re making edits really gives another dimension to the awesomeness
of Haskell.
Similarly to the frontend it’s very convenient to have an automatically reloading backend application while developing. This allows for rapid iterative work without having to invoke additional compilation commands and wait for the results. It’s much less trivial to maintain state like active connections and so on, so I’m fine with having them reset whenever the backend restarts due to a change.
There might be multiple good options for automatically reloading Haskell
sources and running them, but ghcid provides a simple means of doing just that.
ghcid lights up whenever there are compilation errors and otherwise doesn’t
get much in the way when it’s just monitoring files and reloading whenever
something’s changed.
I haven’t bothered with tests yet for the backend in this project, but have good
experience also using ghci as a continuous test runner.
Nix setup
Now that we’ve gone through the technologies used to develop and drive the app
let’s see how to incorporate these into nix.
What we require is to be able to build the project, but perhaps even more importantly is setting up a sweet development environment that doesn’t get in our way. Development setup is important. At the end of the day development of an application is done by humans and I know from experience that development environments are often neglected and so can be complicated to set up as well as breaking frequently. Personally I get really frustrated by poor setups because I know how much it negatively impacts my productivity and ability to maintain quality in my work.
Development environments that “just work™” foster better quality software, as developers are able to focus their mental capacity and energy on solving actual tasks and fixing issues.
A reproducible development environment scales, the mind of a programmer does not.
JavaScript frontend
One thing about this project setup which I find really cool involves the use of node2nix.
In a traditional frontend codebase npm (or yarn) would be responsible for
fetching dependencies into a node_modules directory and ensure the integrity
of them through the use of a package-lock.json file. Node.js will be able to
resolve the dependencies as long as node_modules is somewhere up the directory
hierarchy from the current working directory.
What node2nix does is to parse the package files used by npm in order to
create nix expressions for fetching the dependencies. Without a lock file
node2nix will have to resolve package versions to URLs and hashes, whereas
with a lock file it seems to rely on that directly for a quicker and
deterministic result. I haven’t inspected the source of node2nix, but I
wouldn’t be surprised if it’s making use of npm directly to extract this
information.
The generated files contain various nix derivations, where at the core is a
Node.js environment where all dependencies are available like system packages.
What this means is that the node command has access to all npm packages
regardless of what the current working directory was for the command when it was
invoked. This is done by setting the NODE_PATH to point into the nix store.
In the end what this means is as a long as e.g. the development environment has
been loaded into the current shell there’s no need to even have a
node_modules directory withing the project directory structure at all making
it truly standalone.
There is a catch though. Some tools are not able to resolve the system
dependencies and rather expect to find node_modules in the directory
hierarchy. To work around this we can simply symlink the node_modules from the
node2nix derivation into the build or project directory. This leaves us with
an immutable node_modules symbolic link pointing into the nix store
containing all of the dependencies.
Here’s the entire ./frontend/default.nix with annotations:
{ stdenv, callPackage, nodejs, nodePackages, writeShellScriptBin }:

let
  # Import & invoke the generated files from node2nix
  generated = callPackage ./nix { inherit nodejs; };

  # node2nix wrapper to update nix files on npm changes
  node2nix = writeShellScriptBin "node2nix" ''
    ${nodePackages.node2nix}/bin/node2nix \
      --development \
      -l package-lock.json \
      -c ./nix/default.nix \
      -o ./nix/node-packages.nix \
      -e ./nix/node-env.nix
  '';

in {
  # Location of the node_modules system dependencies
  inherit (generated) nodeDependencies;

  # Build recipe for the static assets
  static = stdenv.mkDerivation {
    name = "xchg-frontend";
    src = ./.;
    buildInputs = [ nodejs ];
    buildPhase = ''
      ln -s ${generated.nodeDependencies}/lib/node_modules ./node_modules
      export PATH="${generated.nodeDependencies}/bin:$PATH"
      npm run build
    '';
    installPhase = ''
      cp -r dist $out/
    '';
  };

  # Development shell with node2nix wrapper script
  shell = generated.shell.override {
    buildInputs = [ node2nix ];
  };
}
We’re not doing it this way for “just for fun”. Flake evaluation is done in a
pure build environment where operations like npm install which fetch packages
from remote locations are not granted network access.
The project makes use of the symlink “trick” on two occasions:
- Above in the
buildPhaseof the “static” derivation when building the static frontend assets. - In the
devserver script to make the dependencies available to thevitedevelopment server.
❯ ls -l
total 36K
lrwxrwxrwx 1 myme users   89 Jan 15 12:47 node_modules ->
    /nix/store/d4nq25...-node-dependencies-xchg-0.0.0/lib/node_modules
The node_modules symlink is added in the project root and not under
./frontend to not interfere with whenever using npm to install new
dependencies or updating old ones. Similarly vite expects to have write
permissions to a node_modules where it seems to place some cache files6.
The build artifacts we’re most interested in from the frontend is static. For
convenience this can be added to the top level flake.nix:
{
  outputs = { ... }: {
    packages = {
      static = pkgs.xchg.frontend.static;
    };
  };
}
Which allows the static assets to be built individually through:
❯ nix build .#static
❯ tree result
result
├── assets
│   ├── favicon.7383218d.svg
│   ├── index.1a52971d.js
│   ├── index.cd59808c.css
│   └── vendor.f9fdb51e.js
└── index.html

1 directory, 5 files
Invoking node2nix
Here’s how the project invokes the node2nix command and instructs it to write
the result files in the ./nix directory. The command is supposed to be invoked
in the ./frontend directory:
❯ node2nix --development \
    -l package-lock.json \
    -c ./nix/default.nix \
    -o ./nix/node-packages.nix \
    -e ./nix/node-env.nix
The node2nix program is wrapped up in a shell script with
writeShellScriptBin in the frontend’s default.nix and added as a build input
to the development shell (excerpt from above):
let
  # node2nix wrapper to update nix files on npm changes
  node2nix = writeShellScriptBin "node2nix" ''
    ${nodePackages.node2nix}/bin/node2nix
      # ... snip
  '';

in {
  # Development shell with node2nix wrapper script
  shell = generated.shell.override {
    buildInputs = [ node2nix ];
  };
}
It can then be invoked directly without having to remember the correct parameters:
❯ node2nixFrontend shell
The shell is also added to the top level flake under devShells like so:
{
  outputs = { ... }: {
    devShells = {
      frontend = pkgs.xchg.frontend.shell;
      # ...
    };
  };
}
Running the frontend shell can then be done using:
❯ nix develop .#frontendThis shell naturally only contains the frontend dependencies of the application. The following sections will show how the server shell is setup and then how the two may be combined into a super-shell environment.
Haskell backend
One thing that’s great with using nix for Haskell development is that
nixpkgs and thus nix’s binary cache cache.nixos.org contains builds of most
of Hackage. Once you’re used to not spending a bunch of time building Haskell
dependencies you never want to go back.
Creating nix expressions from Haskell projects can be done through
cabal2nix. As the name suggests it is a generator for Cabal projects. It
also has a callPackage wrapper under haskellPackages named callCabal2nix
allowing it to be used directly from nix expressions without having to be
invoked separately like with node2nix. Also, whereas node2nix needs to hit
the network to resolve package.json packages callCabal2nix typically won’t
since most Hackage packages are in the nixpkgs package set.
All of this makes defining our Haskell package trivial:
{ haskellPackages }:
{
  server = haskellPackages.callCabal2nix "xchg-server" ./. {};
}
It’s nice to be able to build the server individually in the same way as the
static frontend assets, so it can be added to the flake.nix like so:
{
  outputs = { ... }: {
    packages = {
      server = pkgs.xchg.server.server;
    };
  };
}
Which allows the server to be built individually through:
❯ nix build '.#server'
❯ tree result
result
└── bin
    └── xchg-server

1 directory, 1 file
Backend shell
In the haskellPackages of nixpkgs there are other functions than
callCabal2nix that helps setting up Haskell environments. To create a ghc
shell environment with additional development tools like
haskell-language-server and ghcid there’s the shellFor function:
{ haskellPackages }: rec {
  server = haskellPackages.callCabal2nix "xchg-server" ./. { };
  shell = haskellPackages.shellFor {
    packages = p: [ server ];
    withHoogle = true;
    buildInputs = with haskellPackages; [
      haskell-language-server
      ghcid
      cabal-install
    ];
  };
}
The shell is added to the top level flake in the same manner as the frontend shell:
{
  outputs = { ... }: {
    devShells = {
      frontend = pkgs.xchg.frontend.shell;
      server = pkgs.xchg.server.shell;
    };
  };
}
Running the server shell can then be done using:
❯ nix develop .#serverFrankenshell
When running the development server we want to have access to both the
frontend and backend shell environments. The trouble is that in my
experience nix shell environments do not compose as well as derivations in
general. There might be various ways that the shells provided by node2nix and
haskellPackages.shellFor can be composed, but following is a rather manual
approach.
Time for a hack!
In order to combine the two shells the project defines a mergeEnvs utility
which combines all shell input attributes as well as the shellHook:
{
  outputs = { self, nixpkgs }:
    let
      mergeEnvs = pkgs: envs:
        pkgs.mkShell (builtins.foldl' (a: v: {
          buildInputs = a.buildInputs ++ v.buildInputs;
          nativeBuildInputs = a.nativeBuildInputs ++ v.nativeBuildInputs;
          propagatedBuildInputs = a.propagatedBuildInputs
            ++ v.propagatedBuildInputs;
          propagatedNativeBuildInputs = a.propagatedNativeBuildInputs
            ++ v.propagatedNativeBuildInputs;
          shellHook = a.shellHook + "\n" + v.shellHook;
        }) (pkgs.mkShell { }) envs);
    in { };
}
The function above was snatched from a gist posted on the NixOS reddit:
This is used in flake.nix to compose the default development shell:
{
  output = {
    devShell = forAllSystems (system:
      mergeEnvs nixpkgsFor.${system}
      (with self.devShells.${system}; [ frontend server ]));
  };
}
The default development shell is what nix drops into when invoking:
❯ nix developAt this point all frontend and backend development utilitities should be available:
❯ which ghc ghcid haskell-language-server node npm vite tsc
/nix/store/skj20vlz2hkipj3cgcclzvhbm0hj9q6s-ghc-8.10.4-with-packages/bin/ghc
/nix/store/7fsfkbdwypm4v6vjfv8a0dxrqw1x7rdi-ghcid-0.8.7-bin/bin/ghcid
/nix/store/ap50ycw05bkf9y8q0527lndv4wcfswr6-haskell-language-server-1.1.0.0/bin/haskell-language-server
/nix/store/5kkjf5wvfvclqj76k9f69c95gw5mfbhc-nodejs-14.17.4/bin/node
/nix/store/5kkjf5wvfvclqj76k9f69c95gw5mfbhc-nodejs-14.17.4/bin/npm
/nix/store/i3mahfd9ac2sys8c3j8zfpqpsjl4lf2v-node-dependencies-xchg-0.0.0/bin/vite
/nix/store/i3mahfd9ac2sys8c3j8zfpqpsjl4lf2v-node-dependencies-xchg-0.0.0/bin/tsc
I can begin to stress how mind-bendingly amazing that is! 😎
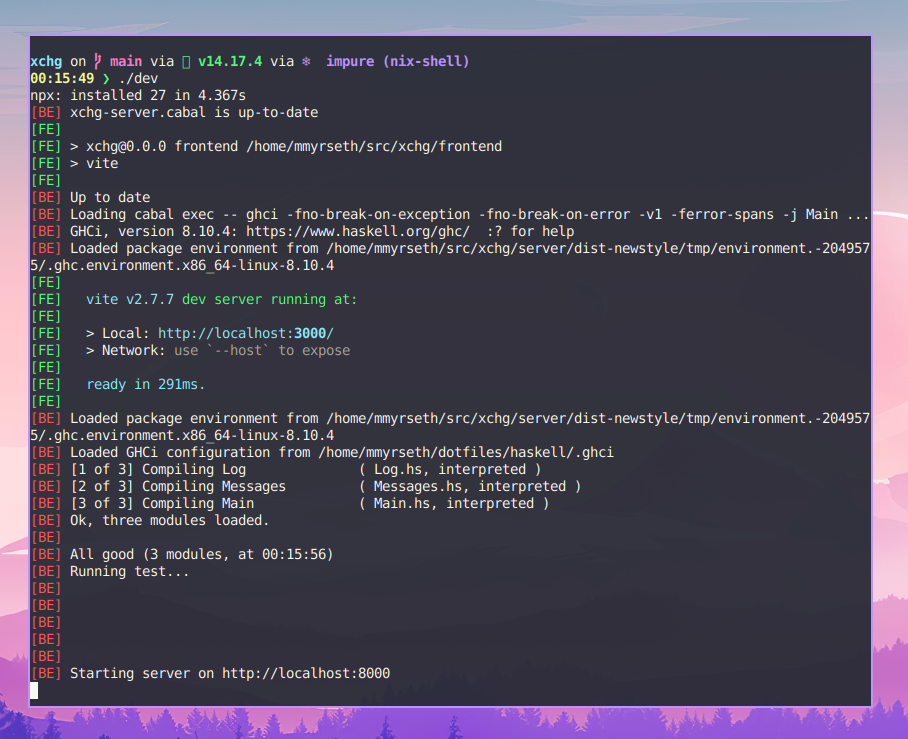
Launch script
Running the app during development requires building the static assets and serving them, as well as building and running the backend server.
There are various options for launching multiple processes on the shell from GNU Parallel to tmux-xpanes. Since the project already is Node.js based I find
concurrently nice and simple to use.
The dev script makes use of the nix run command to launch a specific app
specified in the flake.nix:
{
  outputs = { ... }: rec {
    apps = { dev = pkgs.xchg.dev; };
    defaultApp = apps.dev;
  };
}
This is accessing the dev output from the default.nix in the root folder,
provided through the overlay in flake.nix:
{ writeShellScriptBin, xchg }: {
  dev = writeShellScriptBin "dev" ''
    rm -rf ./node_modules
    ln -s ${xchg.frontend.nodeDependencies}/lib/node_modules ./node_modules
    export PATH="${xchg.frontend.nodeDependencies}/bin:$PATH"
    nix develop --command npx concurrently \
      -n FE,BE \
      -c green,red \
      "cd frontend && npm start" \
      "cd server && hpack && cabal build && ghcid -r Main"
  '';
}
The dev script can then be built and run with the following command:
❯ nix runFor convenience I put this into a tiny script ./dev in the project root:
#!/usr/bin/env bash
nix run
This might seem redundant, but I like finding an executable in the root of a
project directory named ./dev. It gives a good indication how to get started
hacking on the code without having to know exactly how to correctly invoke
nix.
A better virtual env
Developers must be allowed to use the set of tools that they feel comfortable with and make them feel like they’re staying productive in. Although it’s never a bad idea to try out alternatives people tend to prefer one or two editors. I’m sure there are many ways to setup the above environments in most of the mainstream editors, but I cannot list them all in this article.
The most important piece of the puzzle to get a decent editor setup with nix
is that the editor is able to run with the environment generated by nix. The
easiest way to drop into such an environment is through the nix develop
command (nix-shell with the old cli). With flakes the caching of these
environments is ensuring that once an environment is built launching into it is
fast.
nix develop accepts a --command parameter which can be used to launch an
editor or similar job within the environment. For scripts it’s also possible to
use nix print-dev-env that outputs shell code which may be sourced by bash
to reproduce a build environment. However, for a more seamless setup I highly
recommend direnv covered in the following section.
Direnv
One of the key pieces of my editor and shell setup is direnv. It’s shockingly beautiful how well it bridges the gap between a “bare” user environment without globally installed packages and isolated development environments that declare all their dependencies.
As far as I know direnv doesn’t yet come with flake support. Luckily
nix-direnv supports flakes quite well through the use flake hook. Another
benefit of using nix-direnv is that it takes care to add development
environments to nix’s gcroots ensuring they’re not deleted by the garbage
collector. This way development environments won’t be rebuilt until there has
been updates to the flake and they’re garbage collected once the project is
removed. This is great for times like the daily commute where network access is
unstable.
In order to integrate direnv into emacs I rely on the envrc which is curated
by Doom Emacs. There might be direnv plugins for the other mainstream editors,
but I haven’t researched this myself.
Docker container
A Docker container ties everything together into a simple single unit that’s
easy to deploy. One may argue that containers are unnecessary when using nix
because a package closure contains everything it needs to run. Since I’m running
my blog and other apps on a single multi-purpose server I find more comfort in
separating the various apps into containers. With dedicated nodes I would
definitely consider a completely nix based deployment approach like NixOps.
Containers a la Nix goes a bit more in-depth into how Docker / OCI
containers can be created from nix expressions. Long story short using
buildLayeredImage makes creating docker images a breeze:
{ dockerTools, xchg }: {
  image = dockerTools.buildLayeredImage {
    name = "xchg";
    tag = "latest";
    contents = with xchg; [ server.server frontend.static ];
    config = {
      Cmd = [ "xchg-server" ];
      ExposedPorts = { "8000/tcp" = { }; };
    };
  };
}
What is worth noting is that the xchg application is simply an input to the
buildLayeredImage image function. There’s no need to customize or change the
way the artifacts are built. They are stored and served from the container in
the exact same way they are on the host system.
The final image can be built in its entirety by running nix build:
❯ nix build
❯ ls -l result
lrwxrwxrwx 1 myme users 55 Jan 16 21:55 result ->
    /nix/store/cs7q9jff9ddfdi3x8h4hqm1r6rrb37bj-xchg.tar.gz
The resulting image can be loaded directly into docker:
❯ docker load < result
085adbf08859: Loading layer [==================================================>]  174.1kB/174.1kB
dc5a9beb6417: Loading layer [==================================================>]  3.727MB/3.727MB
a64a49591b50: Loading layer [==================================================>]  10.24kB/10.24kB
Loaded image: xchg:latest
And executed:
❯ docker run -d --rm -p 8000:8000 xchg
❯ docker ps
CONTAINER ID  IMAGE  COMMAND        CREATED     STATUS     PORTS     NAMES
bdece8b1d6ab  xchg   "xchg-server"  2 days ago  Up 2 days  8000/tcp  ...
Once all the smaller building blocks have been defined it’s hard to imagine these last few steps being any simpler. Another great example of the power of composition!
Conclusion
This article has obviously centered around nix and flakes specifically.
However, I also hope that it has showed to those familiar to JavaScript,
Haskell and Docker that knowledge and experience from those ecosystems isn’t
wasted when moving to nix. I also hope that the content translates well to
other languages and tools available in the nixpkgs. The fact that nix for
the most part wraps around environments7 rather than insisting on
specific conventions shows some of it’s most important appeal and power.
I’m not going to lie, nix struggles with the fact that the learning curve is
still exceptionally steep. Newcomers must be expected to spend a significant
amount of time pulling their hair, trawling through elaborate but poorly
structured documentation and accept that progress will initially be slow. I’m
hoping through articles of my own and other great efforts like nix.dev that
nix slowly but surely breaches the niche and manages to convince the masses of
its potential. It definitely feels like it’s already starting to happen!
I hope this article has been able to show some of the possibilities of managing
both development and build environments using nix. I believe that developers
who have fewer distractions, less things to worry about and who can reduce yak
shaving will have more mental surplus for the problems at hand. In the end this
leads to happier and more productive developers who will have the prerequisites
to be able to deliver software with higher quality.
Now to answer the title question: Is this in fact the ultimate development
environment? To be honest, the combination of nix flakes with great tools for
type checking, code reloading, editor and shell integration is getting close to
an ideal for me at this point. It’s the sum of great technologies spread across
multiple language barriers all neatly combined with the power of nix.
Got any thoughts or comments on this post? Tweet me a me a reply:
New post: The Ultimate Dev Environment? #nix @nixos_org https://t.co/Nz22Y9j7MX
— Martin Myrseth (@ubermyme) January 16, 2022
Footnotes
As in nothing more fancy than both backend and frontend web technologies.↩︎
My parents might argue “to complicate”, but I digress.↩︎
I’m sorry Copilot - Yeah, feel free to disagree, but no, I’m not fearing for my job just yet.↩︎
Or fetched from binary cache if unchanged.↩︎
Traditionally
nixcommands are dash-separated likenix-store,nix-build,nix-shell, etc.↩︎I would perhaps suggest to use
$XDG_CACHE_DIRfor this, but I assume there are reasons.↩︎With the exception of fetching non-nix dependencies.↩︎